Well, as promised I'm back again with the second part of my basing. In this post I'll attempt to give examples of different ways to put all you basing components together to make what you visualize in your head a reality.
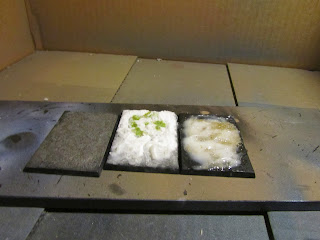
These are examples of a few different ways of applying the first layer of your base. generally I apply then in layers to give more demensions to them
This is what water effects gel looks like applied over a light layer of sand.
Water effects is used for exactly what its name implies. but can be used in many ways
This is baking soda applied over basing glue(white glue essentially) with this you have to top coat it with finish very soon after applying it as it doesn't bond nearly as well as I hoped it would.
This as you can see would be a snow effect around some stati grass or perhaps on a models shoulders
This is super glue and baking soda. It leaves a textured effect and instantly dries. with this you can raise areas by applying layers or leave a texture on something you want to have a pitted and worn appearance.
This is basic cork board. cork board can be used to make a broken stone effect or used to make risers for grass or other basing. I personally prefer to use it along with baking soda, foam bricks and sand to layer up around the separate pieces to make a ruined effect.
This has three of the techniques I use applied to it. the first layer was two part epoxy clay. then I inserted magnets into the clay. I left a valley down the middle which I stacked some foam brick punching in and filled the gaps with sand.
The magnets make the model easier to transport or make it so you can change arms, if your model comes with multiple options.
Here is the cork board as the first layer, around the edges I applied foam bricks and sand making the transition flow a bit more
This is the other options available with water effects. by adding necrotic green to it and shaping divots into it, it gave me just what I needed to make a nurgle base
This is a cork base with the sand, brick and baking soda applied to it. it made for a wonderful ruin to mount my skull cannon model to.
Another recommended technique for paint the base it use washed rather then all paint. I lay down a base coat of what ever color most of the base will be then I wash it back a bit and put a few high lights in by dry brushing a bit
Here are the bases for my plague drones. using the necrotic green mixed with water effects and then washing it with reikland fleshshade(citadel wash) I came out with a lovely rot patch fit for papa nurgle himself
This is a base for my flamer of tzeentch. again water effects with orange was applied and the reikland fleshshade was used to wash the color back a bit
The only major technique that wasn't covered was two part epoxy clay. with this you just cut a piece off and mix it then shape it to whatever you want. its the same as sculpting with clay, you can also wet you tools/fingers and it comes out smoother then it would otherwise(fingerprints are bad mmkay)
This ends this post and remember when your are glued to more then one thing, its time to take a break
Andy


No comments:
Post a Comment